

The Ultralytics YOLO family of object detection models offers advanced yet simple-to-use computer vision capability, and they’re great for deploying on edge devices like the Raspberry Pi. This guide provides step-by-step instructions for how to set up YOLO on the Raspberry Pi and use it to detect objects in images, videos, or a live camera feed. These instructions work on Raspberry Pi models 4 and 5 running the 64-bit Raspberry Pi OS Bookworm release. We also have a YouTube video that walks through this guide, so click the thumbnail below if you prefer visual instructions.
Click here to see the video version of this guide on YouTube!
The Ultralytics YOLO framework makes it easy to train object detection models and deploy them on edge devices like the Raspberry Pi. The Pi’s limited compute power makes it difficult to run larger YOLO models, but smaller models can run in real-time on the Pi’s ARM CPU with a few optimizations. This guide shows techniques for optimizing YOLO models to allow them to run in real-time speed on the Pi.
The guide is split into the following steps:
- Set up the Raspberry Pi
- Set up YOLO Model and Export to NCNN Format
- Run YOLO Model
At the end of a guide, we provide a script that gives a basic example showing how to load a model, run inference on an image source, parse the inference results, and display boxes around each detected class in the image. The script works on an image, video file, or live camera feed.
Step 1 - Set up the Raspberry Pi
When starting this project, it’s best to have a fresh Raspberry Pi OS install to ensure that everything is up to date and there are no unforeseen conflicts on the system. You can use Raspberry Pi Imager to flash an SD card with a fresh OS: make sure to select the 64-bit Raspberry Pi OS Bookworm version. For more details on how to install a new OS on your Raspberry Pi, please follow their installation guide linked here.
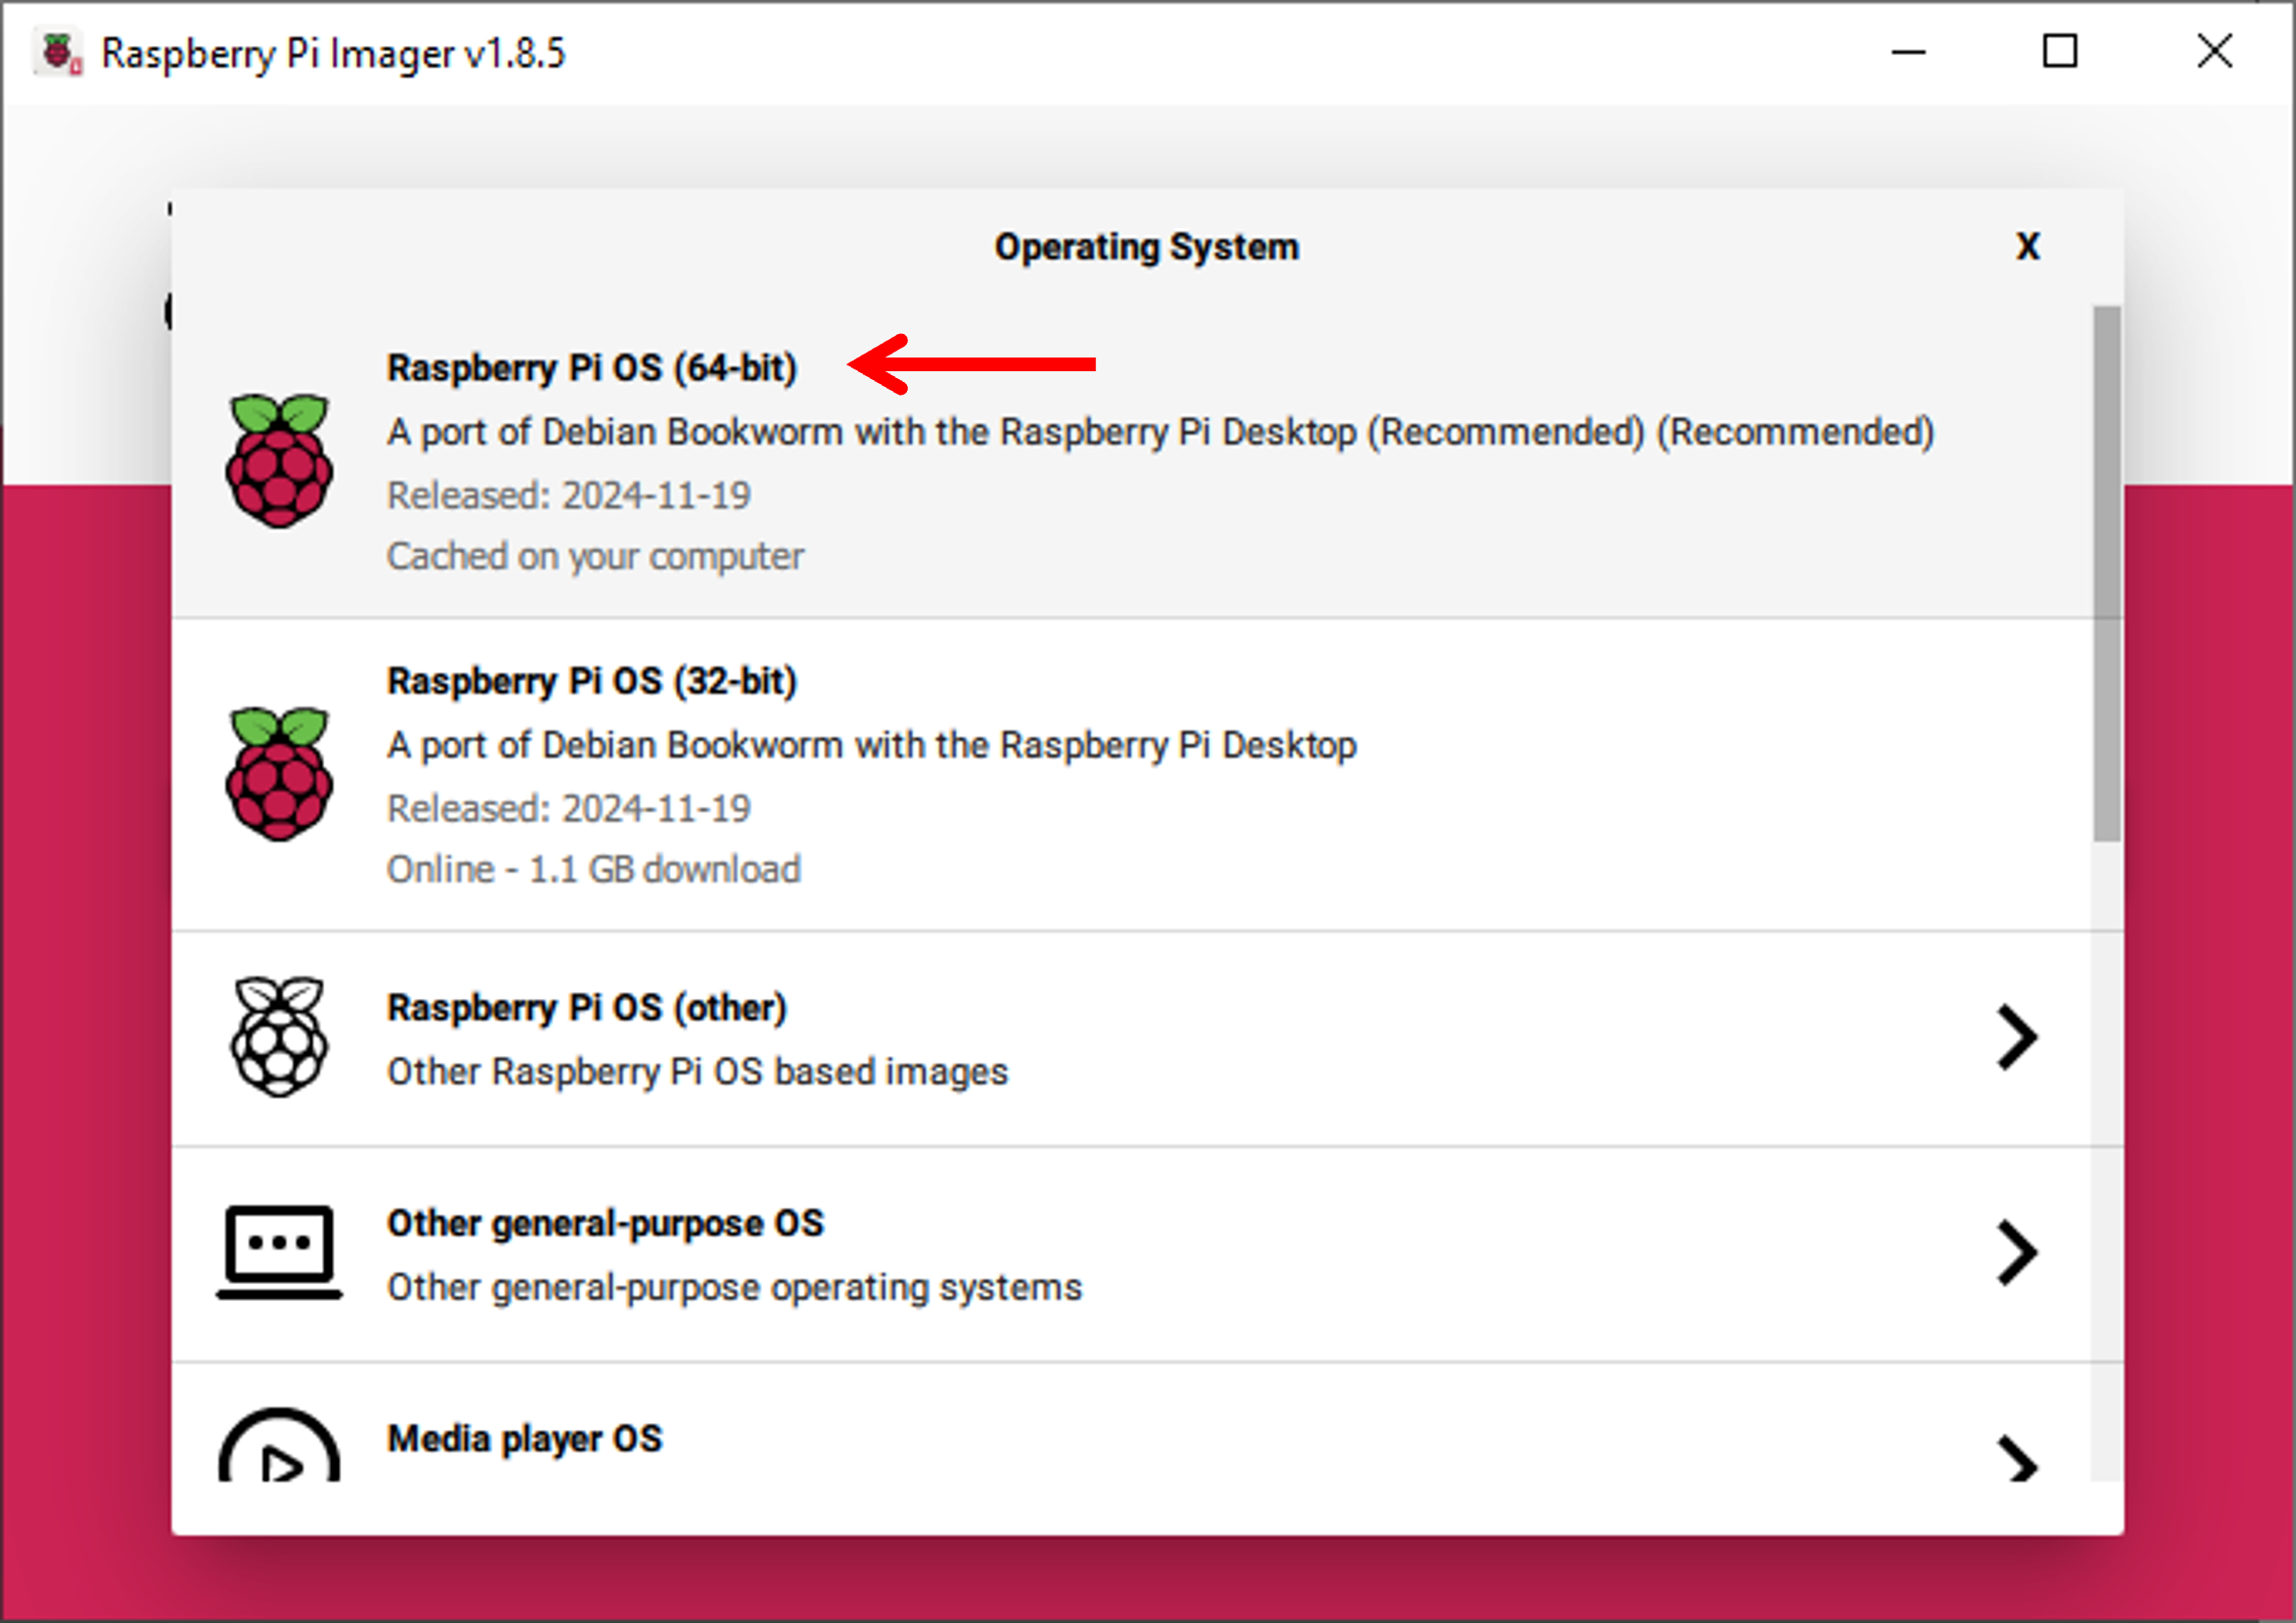
Figure 1. Make sure to use the latest version of 64-bit Raspberry Pi OS. If you run into errors during this guide, it’s best to start fresh with a new install of the OS.
Plug in a monitor, keyboard, and mouse into your Raspberry Pi and turn it on. Connect it to the internet over WiFi or Ethernet.
Step 1a - Update the Raspberry Pi
From the home screen, open a terminal and issue the following commands to make sure that your Raspberry Pi is up to date with its OS:
sudo apt update
sudo apt upgrade
Depending on how long it’s been since you’ve updated your Pi, the update could take anywhere from a few minutes to half an hour.
Step 1b - Create a Virtual Environment
Next, let’s create a working directory to hold our models and code files in. Create a new directory called “yolo” by issuing:
mkdir ~/yolo
cd ~/yolo
Now we need to create a virtual environment to install Python libraries in. Using a virtual environment allows us to avoid version conflicts with existing Python libraries on the Raspberry Pi OS. Create a virtual environment named “venv” and then activate it by issuing:
python3 -m venv --system-site-packages venv
source venv/bin/activate
When the environment is active, “(venv)” will appear before the path in the command prompt, as shown in the image below.
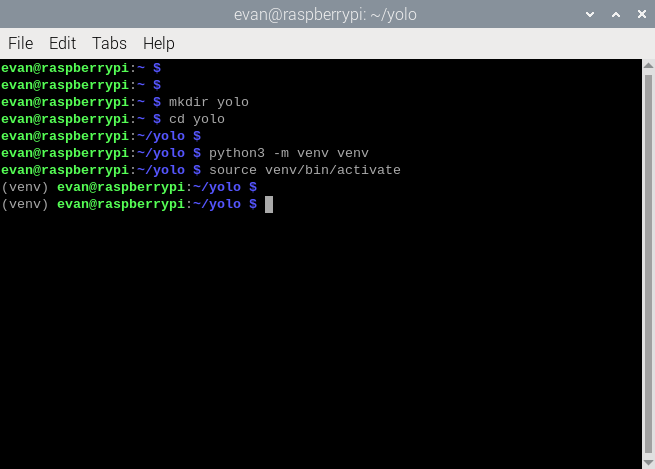
Figure 2. Make sure the virtual environment by confirming (venv) appears at the beginning of the command line.
NOTE: If you ever close and re-open the terminal window or reboot the Pi, you’ll need to issue the “cd ~/yolo” and “source venv/bin/activate” commands to reactivate the environment.
Step 1c - Install Ultralytics and OpenCV
Next, let’s install the Ultralytics and NCNN libraries that will be used for running the YOLO models in NCNN format. Issue the following command:
pip install ultralytics ncnn
IMPORTANT NOTE: The above command can take up to 15 minutes to complete. Sometimes unexpected problems, like an intermittent internet connection or a corrupted download, will cause the installation to halt. If the command takes longer than 15 minutes to finish and seems to be stalled, then simply press CTRL + C and re-run the install command.
Step 1d - Camera Setup
If you haven’t already, plug your camera into the Raspberry Pi. Most USB webcams will work with the Raspberry Pi. If you don’t have one, a good general-purpose USB camera is the Logitech c920, which has good image quality for its cost. The official Picamera modules like the Raspberry Pi Camera Module 3 will also work (make sure to power your Pi off before plugging in the ribbon cable).
Section 2 - Set up YOLO Model and Export to NCNN Format
Now that the Python libraries and virtual environment are ready, it’s time to set up the YOLO model itself. By default, Ultralytics YOLO models are stored in a PyTorch (.pt) file that contains the neural network’s parameters. We’ll take this file and convert it to NCNN format, which is more optimized for running on ARM CPUs like the one on the Raspberry Pi.
For this section, you have two options. You can use an off-the-shelf sample model, or you can use a custom model trained using our YOLO Training Guide.
Step 2a - Set up YOLO Model
Option 1: Download an off-the-shelf YOLO model
Ultralytics makes it easy to download and use an off-the-shelf YOLO model. These models are trained on the COCO dataset and can detect 80 common objects, such as “person”, “car”, “chair”, and so on. To download a YOLO11n detection model, issue:
yolo detect predict model=yolo11n.pt
This will automatically download a “yolo11n.pt” model file and run it on a couple test images. If you want to use a different model, simply replace “yolo11n.pt” with another model such as “yolo11s.pt” or “yolov8n.pt”.
Option 2: Move a custom-trained YOLO model onto the Raspberry Pi
If you’ve already trained a custom model, you can simply move the model file (such as “my_model.pt”) into the “yolo” folder. Use a USB thumb drive, cloud storage folder, email, or whatever method you prefer to move the model file onto the Pi. For instructions on how to train a custom YOLO model, see our article on Training YOLO Models.
Step 2b - Export YOLO Model to NCNN Format
NCNN is an open-source neural network inference framework. NCNN was originally developed to run models on embedded systems with ARM architectures like the Raspberry Pi. It provides the fastest speed for YOLO models on the Pi. The image below (from Ultralytics) shows a comparison between different frameworks on the Raspberry Pi, where NCNN has the overall best inference time.
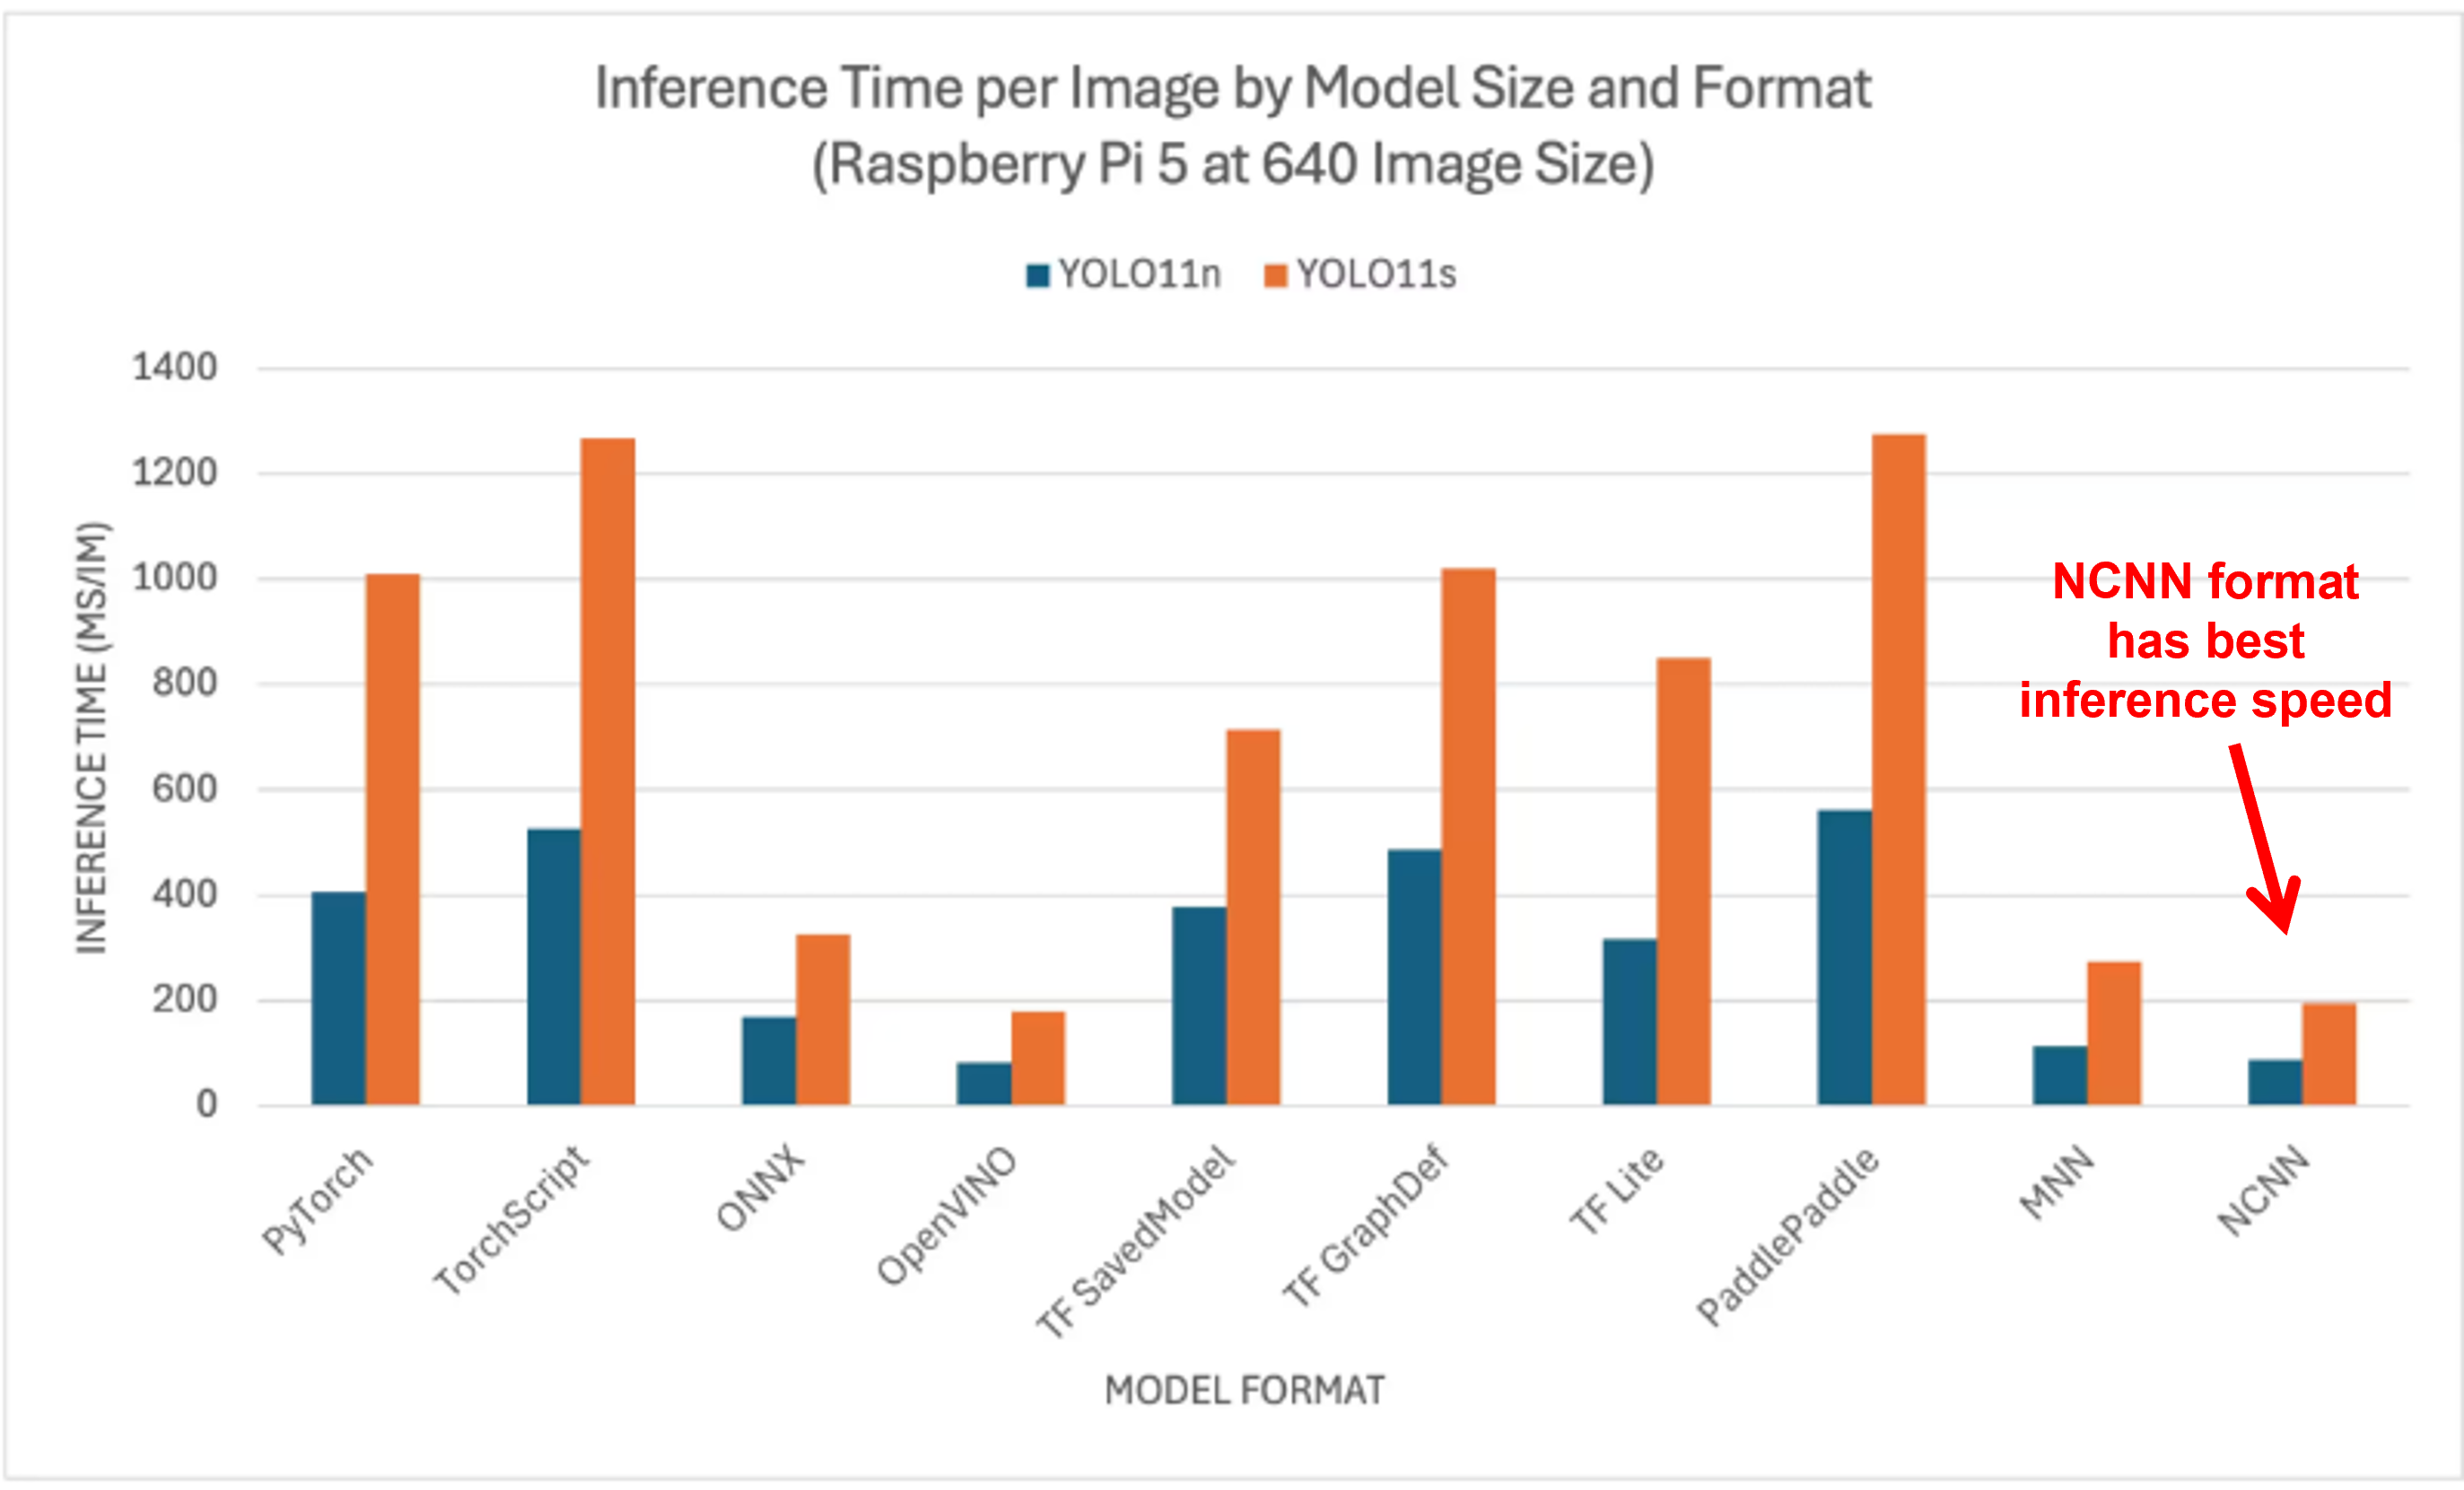
Figure 3. Raspberry Pi benchmark results for YOLO models exported in various formats.
Convert the PyTorch YOLO model into NCNN format by issuing the following command, where “your_model.pt” is replaced with the actual name of your model file (e.g., “yolo11n.pt”).
yolo export model=your_model.pt format=ncnn
This will save a new NCNN version of your model within your current working directory in a folder called “your_ncnn_model”. The model is now ready to run inference!
Step 3 - Run YOLO Model
We wrote a basic Python script, yolo_detect.py, that shows how to load a model, run inference on an image source, parse the inference results, and display boxes around each detected class in the image. This script shows how to work with Ultralytics YOLO models in Python, and it can be used as a starting point for more advanced applications. Download the script to the Raspberry Pi by issuing:
wget https://ejtech.io/code/yolo_detect.py
The script takes three arguments, “model”, “source”, and “resolution”:
- - - model: Path to the trained model weights (e.g. “runs/detect/train/weights/yolo11n_ncnn_model”)
- - - source: Path to an image file (“test_img.jpg”), a folder of images (“img_dir”), a video file (“test_vid.mp4”), or the index for a connected USB camera (“usb0”).
- - - resolution (optional): Resolution in WxH to display inference results at. If not specified, the program will match the source resolution.
Issue the following command to run detection with the “yolo11n_ncnn_model” model using a connected USB camera at 640x480 resolution, issue. If you’re using a custom model, replace “yolo11n_ncnn_model” with the name of the custom NCNN model folder (e.g. “custom_ncnn_model”).
python yolo_detect.py --model=yolo11n_ncnn_model --source=usb0 --resolution=640x480
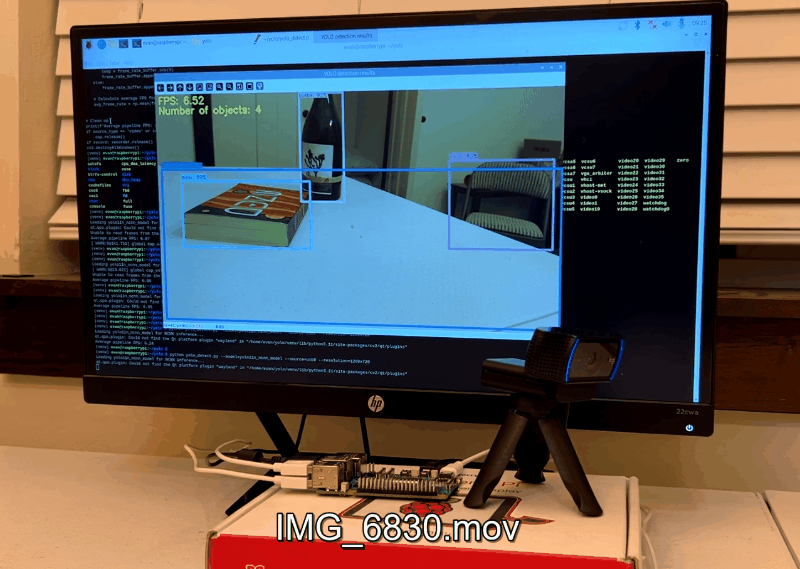
When the script runs, it loads the model file and begins inferencing frames from the camera. The script draws the detected bounding boxes on each frame and displays it to the screen. On our Raspberry Pi 5, we achieved about 8 FPS running the off-the-shelf YOLO11n NCNN model. Press “q” to stop the script.

Figure 4. The yolo_detect.py script running on a live camera feed to detect objects on a table.
Here are other examples commands showing how to run the script on a video file or an image:
python yolo_detect.py --model=yolo11n_ncnn_model --source=test_video.mp4  # Run on video file named “test_video.mp4”
python yolo_detect.py --model=custom_ncnn_model --source=img_dir # Run on folder of images named “img_dir”
If you get an error saying “Unable to receive frames from the camera”, it indicates there is a connection issue with the camera. Try re-plugging it or using a different camera. You can also try Google searching for solutions to any errors.
Conclusions and Next Steps
The Raspberry Pi is just powerful enough to run nano and small-sized YOLO models in real time. Combined with its versatile hardware interfaces, this makes the Pi ideal for intelligent systems that act on visual data from the world around them. There are a few ways you can improve the basic detection program we built in this article:
- Extend your application beyond just deploying YOLO pre-trained models and start training your own models with datasets that you collect. Add functionality like choosing a specific number of classes to train your model on and then expand this based on the project at hand. Increase the model’s accuracy with tips from our article on labeling effective training datasets.
- See our GitHub repository for examples that show how to toggle Raspberry Pi GPIO when certain conditions occur. For instance, create a smart reading lamp that turns on whenever a person is detected sitting on the couch!
- Improve speeds even more by reducing the model resolution or using specialized accelerator hardware like the Raspberry Pi AI Hat.
If you are having trouble setting up the Raspberry Pi to run inference with YOLO, make sure that it is up to date and then reboot the device. You can also try uninstalling and re-installing the packages listed in this article if you had already installed them before following this guide.
EJ Technology Consultants has developed production-quality YOLO models for various applications, like traffic safety, casino game monitoring, hazard detection, and more. If you need help with any part of the model development process, whether it’s building a dataset, finding optimal training parameters, or deploying the model on edge devices, please contact us at info@ejtech.io or schedule a meeting on our Contact page. In the meantime, keep on training, and good luck with your projects!