Object detection models are a branch of artificial intelligence (AI) that use deep learning to identify and locate objects in images and videos. By analyzing millions of examples, these models learn to recognize patterns and relationships between pixels, enabling them to identify objects and pinpoint their exact location within an image. They’re a key component of modern computer vision applications that can interpret and react to visual data from the world around them.
TensorFlow, an open-source deep learning framework developed by Google, provides tools for training models like SSD-MobileNet or EfficientDet to detect custom objects. Models trained by TensorFlow can be converted to TensorFlow Lite format, which are specialized for running on mobile devices and other environments with limited compute resources.
This article summarizes the process for training a TensorFlow Lite object detection model and provides a Google Colab notebook that steps through the full process of developing a custom model. By reading through this article and working through the notebook, you’ll have a fully trained lightweight object detection model that you can run on computers, a Raspberry Pi, cell phones or other edge devices.
Google Colab Training Notebook
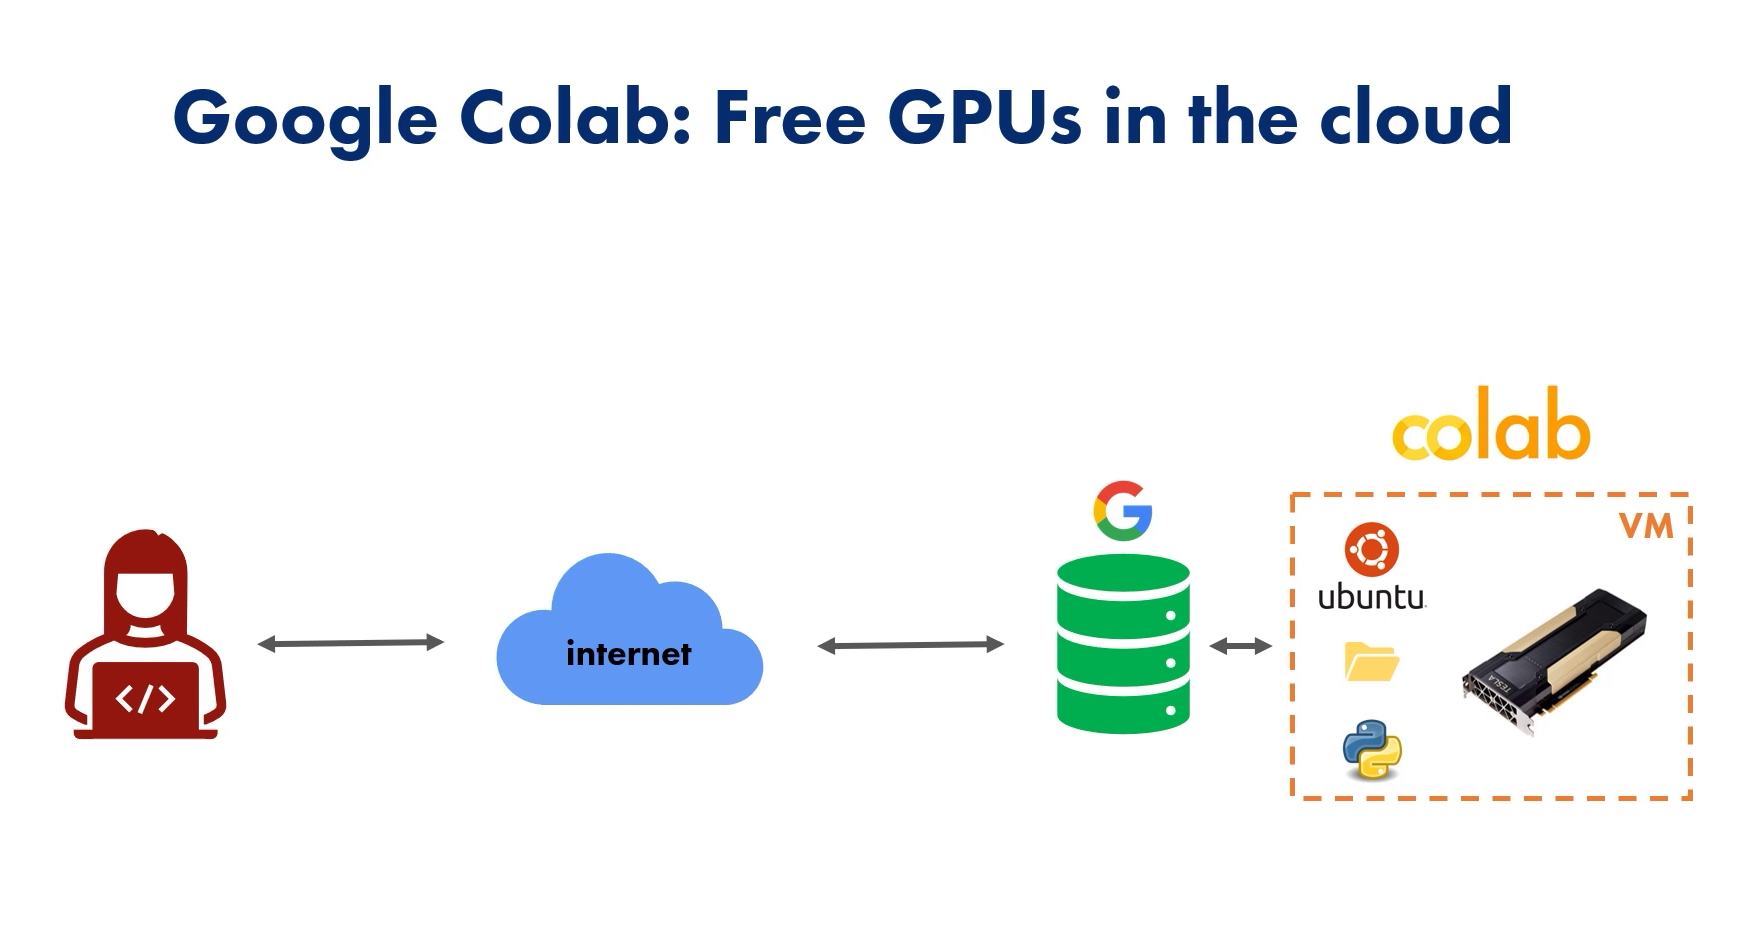
To help you get started with training your own model, I created a Google Colab notebook that walks through the training process. Colab is a free Google service that allows you to write and run Python code through your web browser. It connects to a virtual machine on Google servers that’s complete with a Linux OS, a file system, Python environment, and best of all, a free GPU.

Figure 1. Google Colab provides a cloud-based virtual machine that can be used for training models.
We’ll upload our training data to this Colab session and use it to train our model. Click the link below to open the notebook in a new tab and get started with training your model!
The notebook goes through the following steps:
- Gathering images (which we discussed in the previous section)
- Install TensorFlow object detection dependencies
- Upload image dataset and prepare training data
- Set up training configuration
- Train custom object detection model
- Convert model to TensorFlow Lite format
- Test TensorFlow Lite model and calculate mAP
More information on each step is provided in the notebook. The notebook already has the code and commands ready to run. Working through the notebook is as simple as pressing the “Play” button on each block of code.
Model Training Process
Training Your Model
There are four primary steps to developing an object detection model: 1) gathering training images, 2) selecting a model, 3) training the model, and 4) deploying the model. The Colab notebook will walk through each of these steps.
1. Gather and Label Training Images
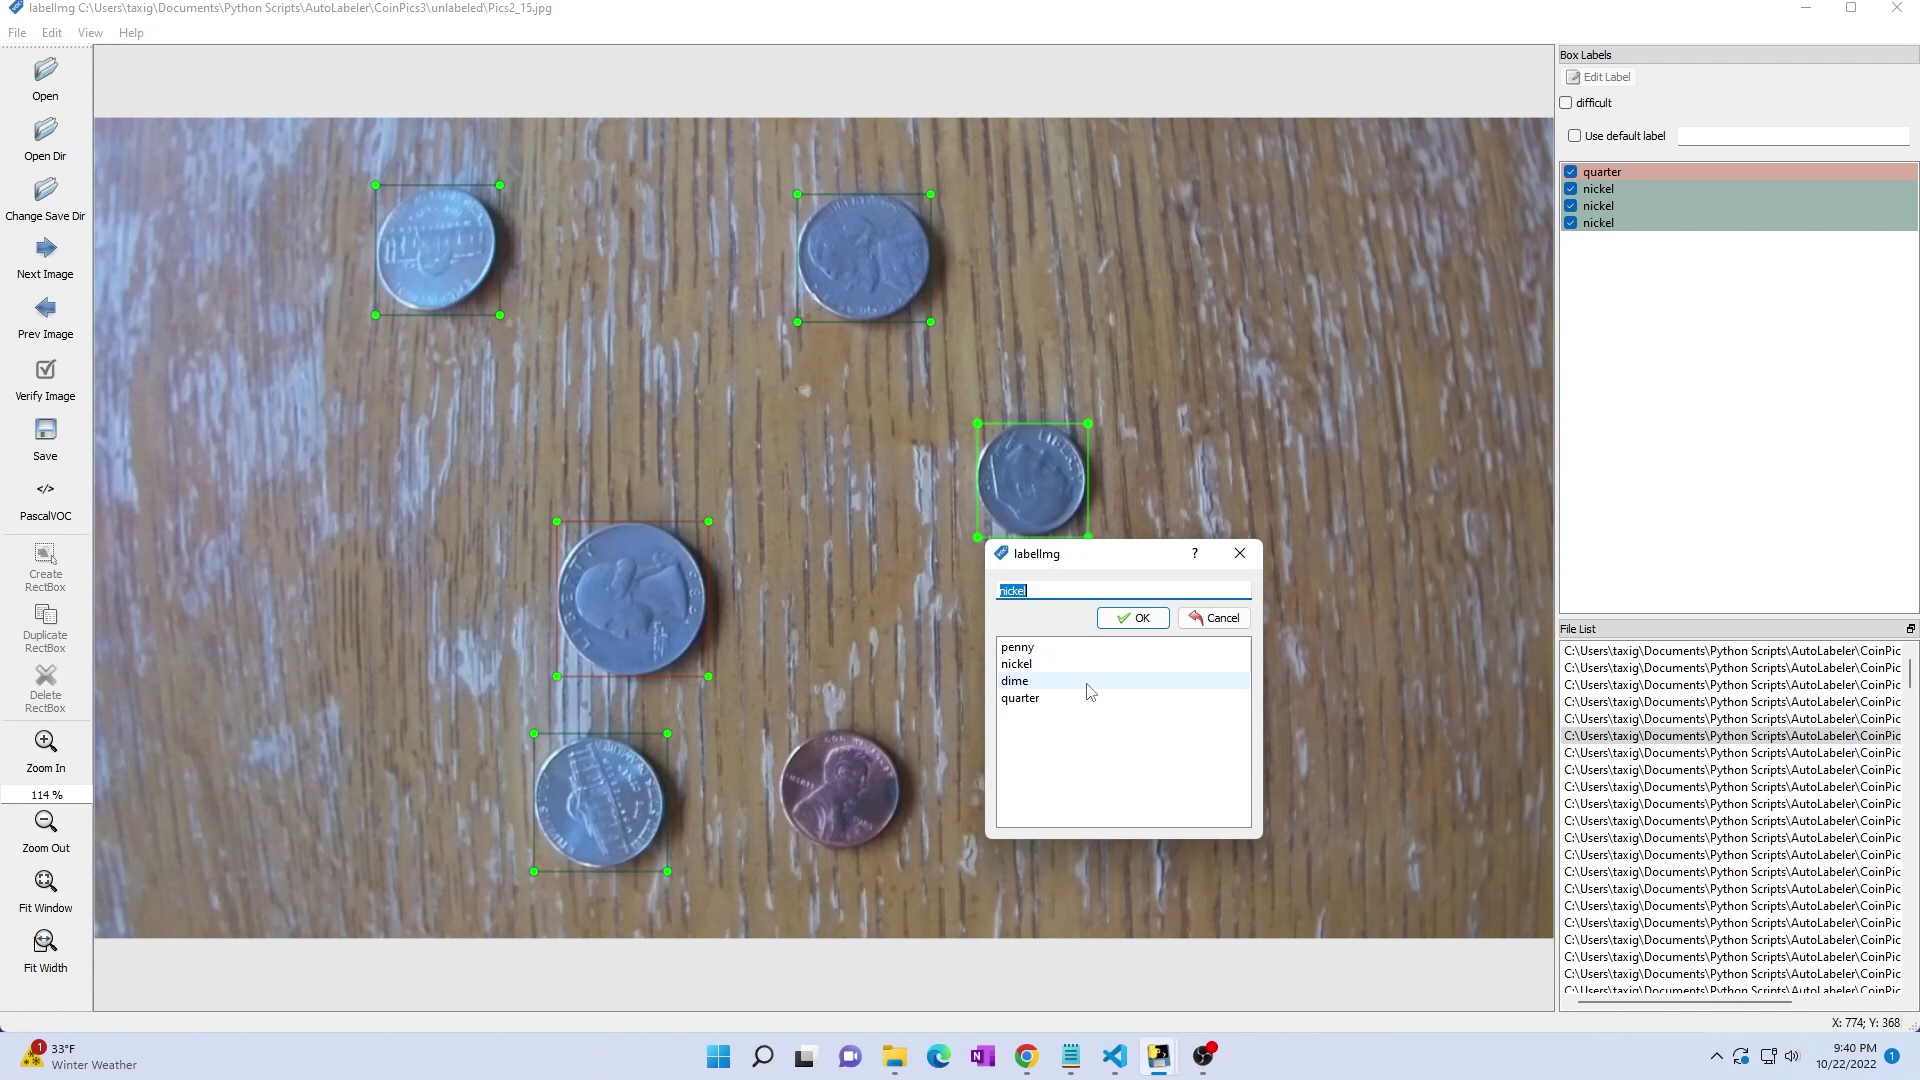
The first step in training a machine learning model is to create a dataset. You’ll need to gather and label at least 200 images to use for training the model. I made a YouTube video that gives step-by-step instructions on how to gather images and label them using an annotation program called LabelImg. The video also shows dataset tips and best practices that will help improve your model’s accuracy. Go check it out! I’m currently writing an article summarizing the tips in video, and I’ll post it on the Learn page when its ready.

Figure 2. Gathering and labeling coin images to train a custom coin detection model.
To gather images, use a phone or webcam to take pictures of your objects with a variety of backgrounds and lighting conditions. You can also use images you find online, but I recommend taking your own pictures because it usually results in better accuracy for your application. Once you’ve gathered about 200 images, you can use an annotation program called LabelImg to draw bounding boxes around each object in each image. Again, my other YouTube video will walk you through how to do this.
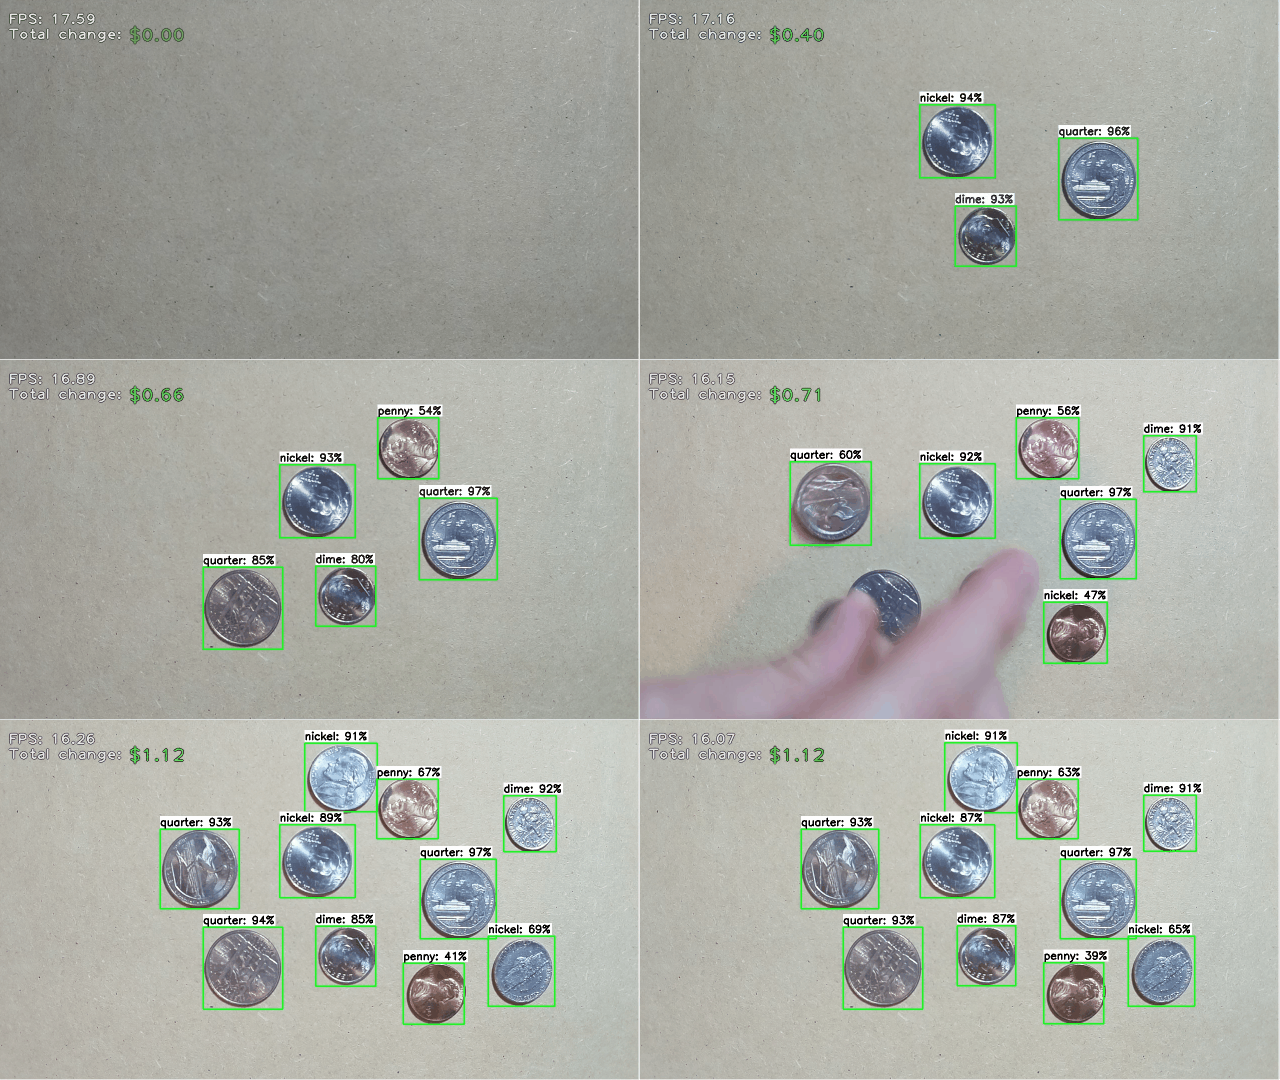
If you don’t want to gather images yet and just want to practice training a model, that’s fine! I created a coin image dataset that you can use to train a model that detects U.S. pennies, nickels, dimes, and quarters.
2. Selecting an Object Detection Model
The TensorFlow Object Detection API provides several off-the-shelf models to train. Each model offers a different level of speed and accuracy. For an in-depth analysis on each model and how to choose which will work best for your application, see my article on TensorFlow Model Performance Comparisons. There are several models to choose from that are supported by the training notebook:
- SSD-MobileNet-v2
- SSD-MobileNet-v2-FPNLite-320x320
- EfficientDet-d0
By default, the notebook will use the SSD-MobileNet-v2-FPNLite model, but you can select a different one in the Configuration section. The configuration will also set other training parameters, such as the number of steps to train and batch size.
3. Train Model
To train a model, you must install the appropriate TensorFlow libraries, set up the expected directory structure, and configure the training parameters. The notebook automatically performs these steps as you click through it. Once the environment set up and training is configured, the model can be trained.
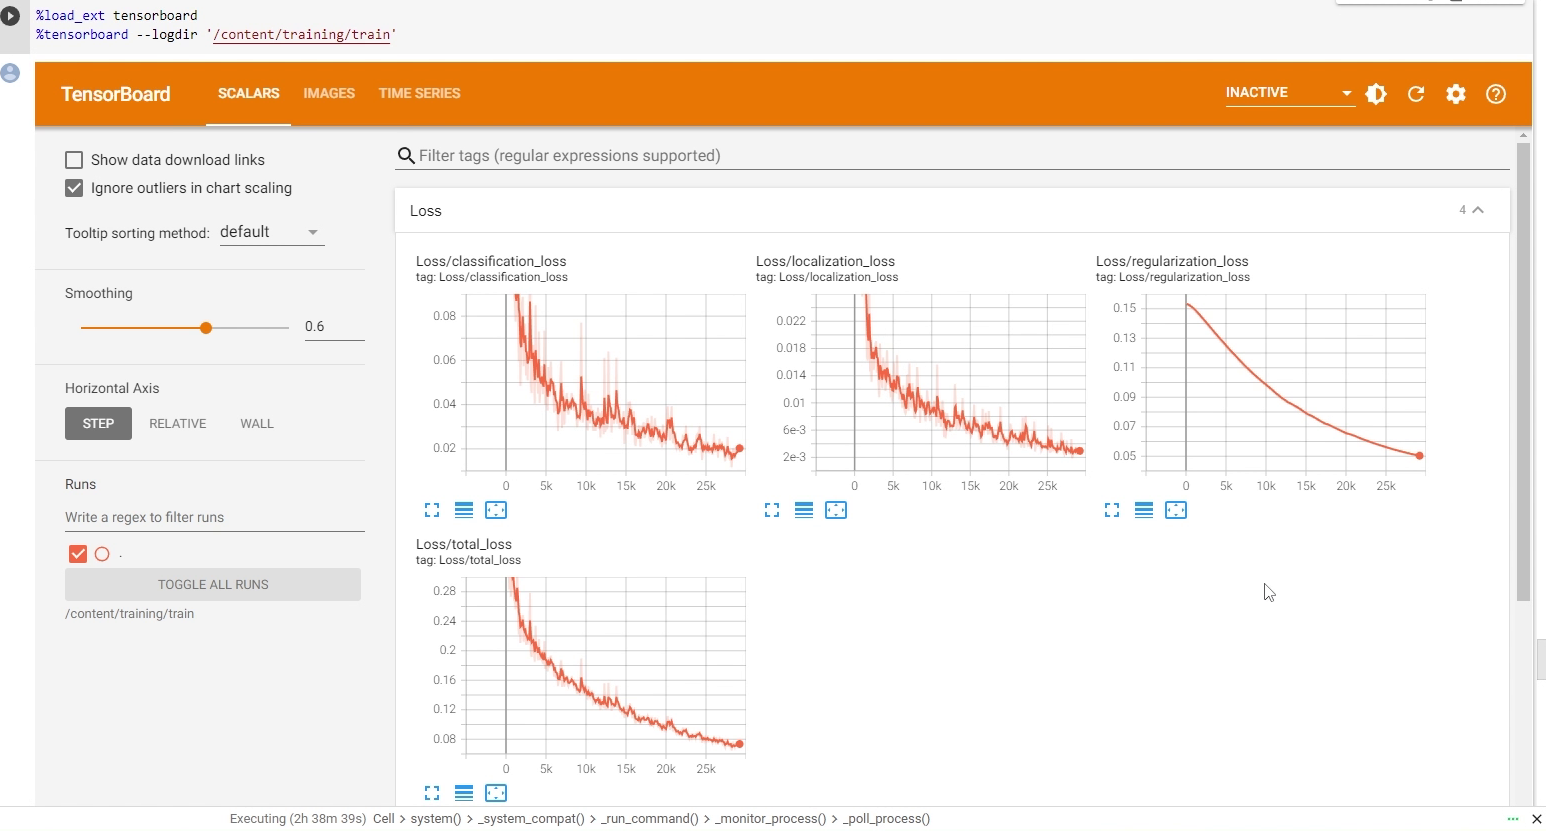
When you reach Step 5 in the notebook, you’re ready to begin training the model. The notebook will execute the training script, which continuously feeds training images to the model, processes them, and adjust the model’s weights to better fit the data. It consumes a significant amount of GPU, and the training process can take anywhere from two to six hours. The notebook also sets up a TensorBoard window to display progress during training.

Figure 3. TensorBoard shows the model's loss decreasing over time during training.
After training finishes, the notebook converts the trained model to TensorFlow Lite (TFLite) format. TFLite is a lightweight library intended for running models in resource-constrained environments. Converting the model to TFLite format increases its speed while preserving its accuracy. The model is converted to TFLite format in Step 5 in the notebook.
4. Deploy Model
Once you’ve worked up through Step 7 in the notebook, you’ll have a fully-trained TensorFlow Lite object detection model. You can download the resulting .tflite model file to your local device. It will be saved in a model.zip folder that contains the model itself model.tflite and a label map of the classes it can detect labelmap.txt.
Now that you’ve trained and downloaded TFLite model, what can you do with it? Well, TensorFlow Lite models are great for running on a wide variety of hardware including PCs, embedded systems, Raspberry Pis, phones, and many other edge devices. I wrote instructions for running your model on various devices including the Raspberry Pi, Android phones, or Windows, Linux, or Mac OS computers. Here are links to each guide:
- How to Run TensorFlow Lite Models on the Raspberry Pi
- How to Run TensorFlow Lite Models on Windows
- How to Run TensorFlow Lite Models on macOS
- Android link coming soon!
Try deploying your model on a device of your choosing and see how it works. Note that TensorFlow Lite models do not run on GPUs: their speed will be dictated by the compute capability of the CPU in the device its running on. We can optimize the model further by quantizing it, but more on that later.
Next Steps
At this point, you’ve configured, trained, and deployed an object detection model in a computer vision application. For detailed information, code snippets, visual aids, and expert tips, we encourage you to continue exploring the Google Colab notebook, YouTube tutorial, and GitHub repository associated with this guide. Object detection models are at the the core of many modern computer vision applications, such as self-driving cars, quality inspection systems, blackjack card counters, and much more. Keep an eye on the Learn page and our YouTube channel for more tutorials on how to create your own vision-enabled applications.
You’ll notice we didn’t quite cover all the content in the Colab notebook. You can squeeze some more performance out of your model using a compression technique called quantization. Step 9 of this notebook shows how you can quantize a model with the TensorFlow Lite Converter to make it run faster without sacrificing its accuracy. If you have a Coral USB Accelerator, the notebook also shows how to compile your model for EdgeTPU.
If you need help training a model, evaluating which model is best for your application, building an image dataset for training, or just learning more about the process, we’re happy to provide consultation specific to your use case. We’ve trained hundreds of models for a wide variety of real-world applications. Our experience will accelerate your product’s development and ensure you’re using the best technology available.
To get in touch, send us an email at info@ejtech.io. Thanks for reading, and good luck with your projects!


