
The plug-and-play functionality of USB camera modules makes them ideal for quickly adding vision capabilities to an existing hardware system. However, if you want to use multiple USB cameras, it’s more complicated than just plugging a camera into every USB port available on your computer or device. This article covers hardware requirements to consider when running multiple USB cameras simultaneously on a single device. It also provides a basic code example for running multiple cameras with OpenCV and Python.
The universal compatibility of most USB cameras is thanks to the USB Video Class (UVC) specification, which defines a standard set of communication and streaming protocols for USB cameras. Most consumer USB cameras use the UVC specification, and most operating systems have a built-in UVC driver for communicating with these cameras. If your device has a USB port and runs Windows, macOS, or Linux, it should be immediately compatible with any USB camera that uses the UVC standard.
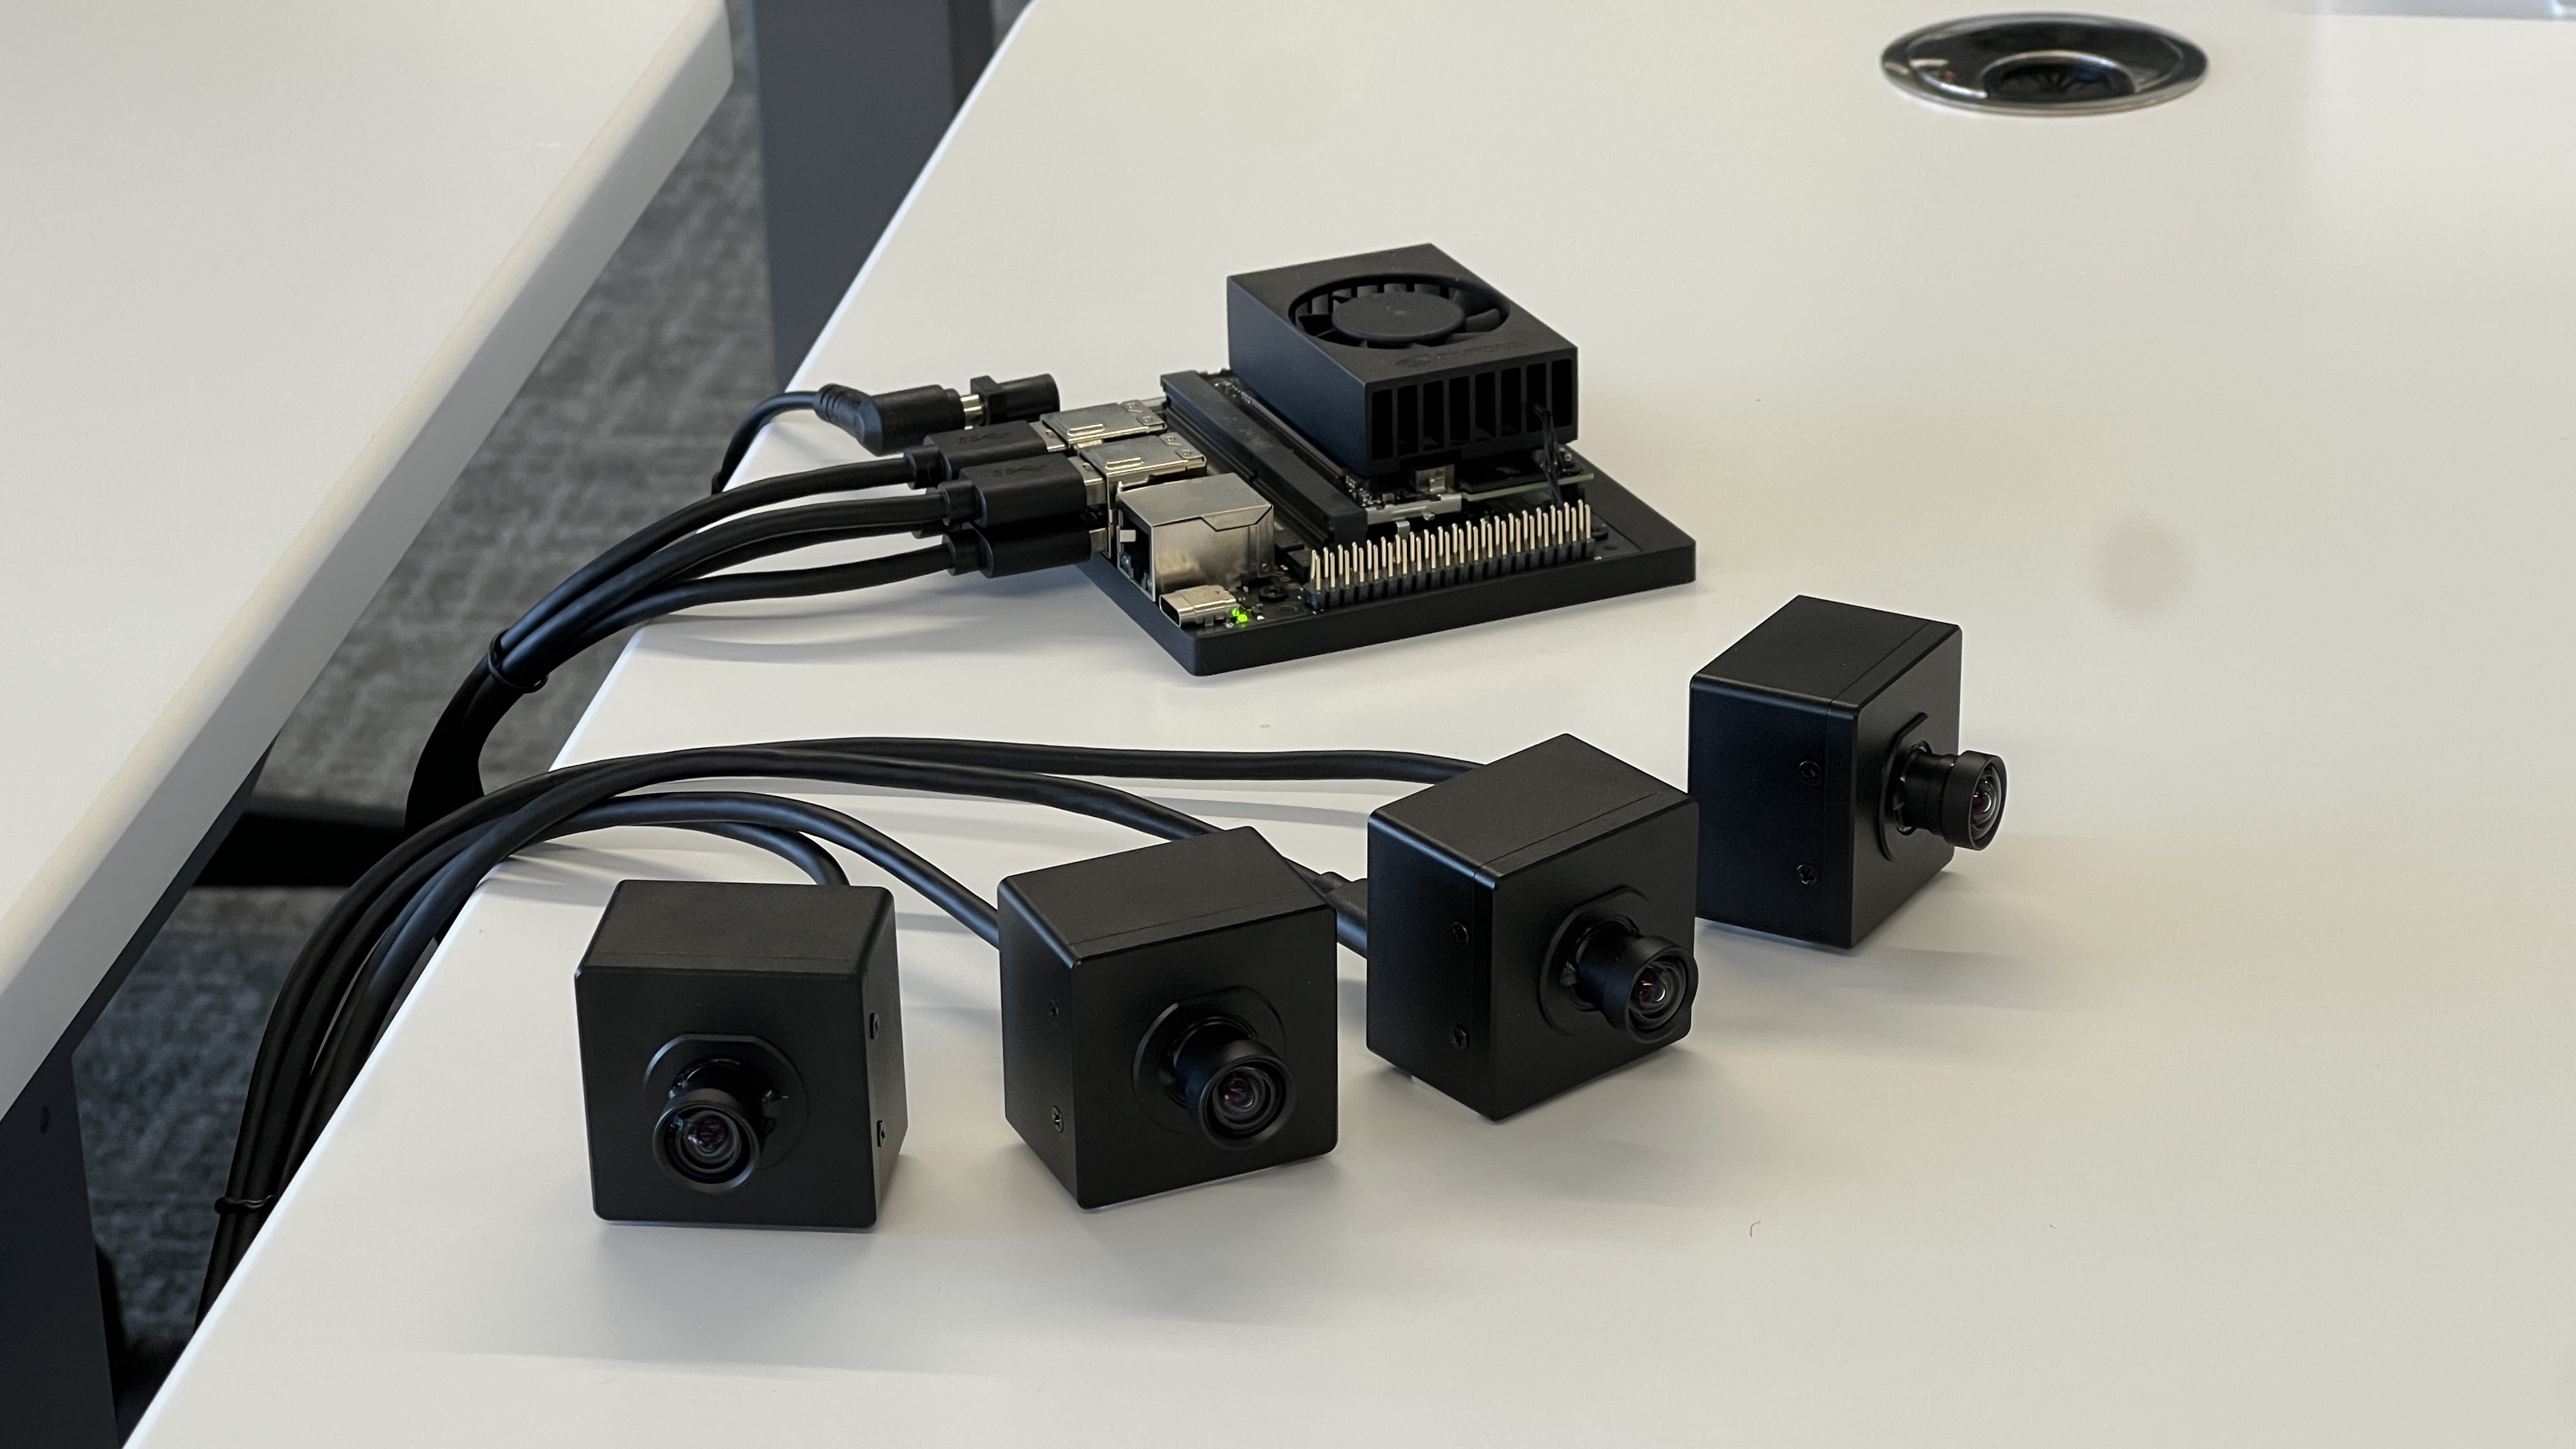
Figure 1. A Basler ace Camera module with USB3.0 interface.
However, there are some drawbacks to USB cameras:
- As stated above, USB cameras require the device to run an operating system. Applications running on edge processors like an ESP32 or Arduino are often too lightweight to deploy a full operating system. Custom USB camera drivers can be adapted for RTOS or bare-metal systems, but it takes engineering time and effort.
- USB devices generally suffer from random disconnects or dropped data. If your application will run 24/7 for months on end, there’s a risk that the camera will disconnect and need to be restarted.
Even with these limitations, USB cameras are still ubiquitous in real-world systems. Production applications use industrial-grade USB cameras from suppliers like The Imaging Source and Basler, who write their own firmware and drivers to guarantee zero disconnects and minimal dropped frames. The drivers also provide complete developer control over camera properties like exposure, sharpness, and white balance. Lower cost UVC-based USB cameras can also be used, but the application should be written to handle disconnects and should be tested for long runtimes before deployment.
Hardware Considerations for Using Multiple USB Cameras
Running multiple USB cameras isn’t as simple as plugging one camera into every USB port on a device. If you plug multiple USB2 cameras into USB ports that share the same channel, you’ll likely get strange errors where you can run each camera individually but not both at the same time. While most USB devices (like keyboards, mice, and speakers) use a small amount of bandwidth, cameras need a high amount of bandwidth to stream compressed video data. There must be enough USB channels and bandwidth to stream video from each connected camera.
USB Channels and USB Ports
It’s important to know the difference between a “USB port” and a “USB channel”:
- USB channel: The data communication pathway through which data travels between a host device and a connected USB device. The number of USB channels a device has depends on the number of USB controllers in the hardware.
- USB port: A physical socket on a computer or other device where USB cables can be connected. Typically, multiple USB ports share a single USB channel. If a USB hub is plugged into a port, all ports on that hub will also connect to the same USB channel.
To help understand the difference between USB channels and USB ports, let’s look at the Jetson Orin Nano Super Developer Kit (shown in Figure 2 below). This information is taken from the Orin Nano’s hardware specification.
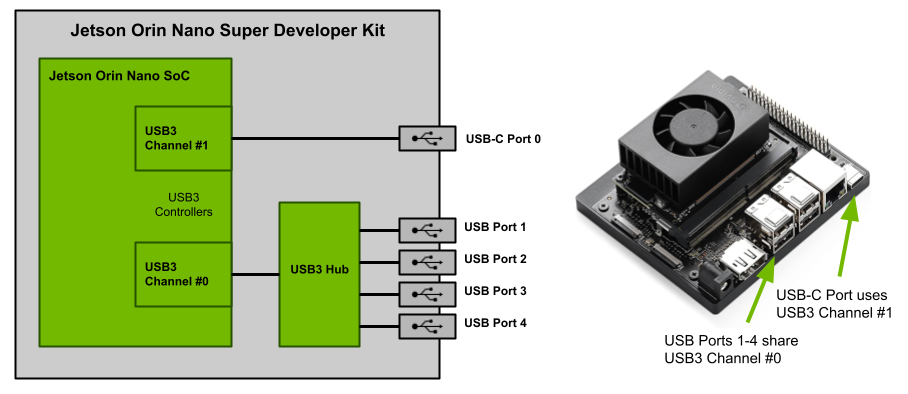
Figure 2. The Jetson Orin Nano Super Developer Kit has two USB3 channels. The four USB-A ports share one channel, and the USB-C port uses its own channel.
The SoC (system-on-chip) at the heart of the Jetson Orin Nano has two USB3 channels. USB Channel #0 connects through a USB hub to the four physical USB ports on the kit. USB Channel #1 connects to the USB-C port. When devices are plugged into the four USB ports on Channel #0, they all share the same data pathway to the central processor. If four cameras are plugged into the four USB ports, the channel must have enough bandwidth to stream the video from each channel.
USB2 vs USB3
This is where the distinction between USB2 and USB3 becomes important. Even though the Jetson Orin Nano’s USB Channel #0 supports USB3, when a USB2 device is plugged into the channel, it will automatically force the entire channel to fall back to the lower-bandwidth USB2 standard for communication. The 480 Mbps bandwidth provided by USB2 is usually not enough bandwidth for multiple cameras when considering overhead from the communication bus, operating system kernel, and camera drivers. Essentially, the entire channel will only support one USB2 camera (or two if the resolution is low enough).
However, if USB3.0 or greater devices are used, the channel will use the USB3 standard for communication, so its full bandwidth will be available. The USB3.2 channel on the Jetson Orin Nano provides 20 Gbps bandwidth, which is enough to stream compressed video from four or more cameras. Thus, the one USB channel will support four or more cameras if USB3 cameras are used. The Orin Nano also has a second USB channel available (USB Channel #1) through the USB-C port, so you can plug a USB hub into that port to support even more cameras.

Figure 3. USB3 channels support multiple USB3 cameras. If a USB2 camera is plugged into a USB3 channel, it is forced to use USB2 speeds, which will only support one camera.
Number of USB2 and USB3 Channels Available
As discussed above, the device must have enough USB2 or USB3 channels to support all the connected cameras. There are several ways to determine the number and type of USB channels available on your device:
- If you’re on a Windows PC, you can use UsbTreeView, a simple and free USB device tree viewer. It will list every USB Controller and USB Root Hub on the device (a single USB Root Hub is a single USB channel).
- For macOS devices, open a terminal and issue “system_profiler SPUSBDataType”. It will list every USB Controllers on the device (a single USB Controller is a single USB Channel).
- If the computer or device uses Linux, open a command terminal and issue “usb-devices”. Each “Bus = NN Lev = 00” item on the list is a USB Channel.
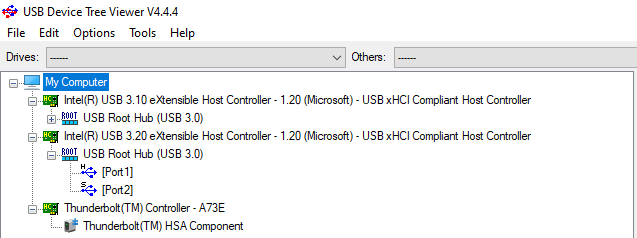
Figure 4. A list of USB Root Hubs (i.e. USB Channels) available on my Dell Laptop as shown by UsbTreeView. Each Root Hub has multiple Ports available.
In addition to checking the number of channels available using software tools, you may also be able to look it up in the hardware specifications. Off-the-shelf embedded computers like the Jetson Orin Nano and Raspberry Pi 5 often indicate how many USB channels and ports are available in their hardware documentation.
Summary
The number of simultaneous USB cameras you can run on one system depends on the number of USB channels and ports available.
- Generally, you can only use one USB2 camera per USB2 or USB3 channel, regardless of how many physical USB ports are available on that channel.
- You can use multiple USB3 cameras per USB3 channel, where the number of cameras is limited by the bandwidth available (typically four or more).
USB3 cameras cost 2-4x more than equivalent USB2 cameras, primarily because of the higher bandwidth supported. If you’d prefer to use USB2 cameras to save cost, you can increase the number of USB channels available in the system by adding hardware like this StarTech 4-channel USB3.0 PCIe card.
Running Multiple USB Cameras with Python and OpenCV
Now that we’ve got the hardware figured out, let’s go over a code example that shows how to run all the cameras. I wrote a basic program example, multi_usb_cam.py, that shows how to run and display frames from multiple USB cameras with OpenCV and Python. It also uses OpenCV to apply a black-and-white threshold to the frames if specified by the user. This section will briefly explain how the code works and give instructions on how to run the program. The instructions are written for Windows, but they will also work for Linux or macOS with slight modifications to the file paths.
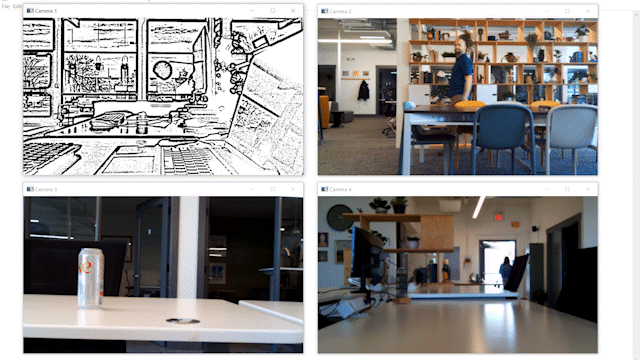
Figure 5. The multi_usb_cam.py script displaying frames from four USB cameras, with the top-left camera having a threshold applied.
These are two types of USB cameras I typically use for prototyping (they will both work with this guide):
- USB3 camera: Adrucam 12MP IMX477 USB Camera
- USB2 camera: Arducam 5MP OV5648 USB Camera
Generally, any UVC-capable USB camera should work with this example.
Python Code and Explanation
Overview
The multi_usb_cam.py program uses OpenCV to run multiple USB cameras simultaneously, process the captured frames, and display them in separate windows. You can see the full code here: multi_usb_cam.py.
1. Importing Packages
# Import necessary packages
import sys
import cv2
The program starts by importing necessary packages: sys for system-specific parameters and functions, and cv2 for OpenCV functions.
2. User-Defined Parameters
# Number of cameras to run
num_cameras = 4

# Specify each camera resolution in (Width, Height)
cam1_res = (1280, 720)
cam2_res = (1280, 720)
cam3_res = (1280, 720)
cam4_res = (1280, 720)

cam_resolutions = [cam1_res, cam2_res, cam3_res, cam4_res]
enable_thresholding = [True, False, False, False]  # Set to "True" to enable black-and-white thresholding on each camera
In this section, you can define the number of cameras to run and their respective resolutions. The enable_thresholding list indicates whether to apply thresholding (black-and-white conversion) on each camera’s frames: set the values to True if you want to apply a threshold for that camera.
Important note on resolution: Most camera modules (USB or otherwise) support a fixed number of native resolutions, such as 1920x1080 and 1280x720. For example, see the Arducam IMX477 Camera Module specifications for a list of its supported resolutions. If you try to use a resolution that isn’t on the list, the camera will usually default to using the closest native resolution. If you set the resolution at 640x480 but still receive 1280x720 frames from the camera, that’s why.
3. Initialize Cameras
### Initialize cameras
caps = [] # Array to hold camera VideoCapture objects

for i in range(num_cameras):
    cam_index = i # 0, 1, 2, etc
    #cam_index = i * 2 # 0, 2, 4, etc (uncomment this if using Linux)
    cap = cv2.VideoCapture(1 + cam_index) # Initialize camera by its device index
    ret = cap.set(3, cam_resolutions[i][0]) # Set camera resolution width
    ret = cap.set(4, cam_resolutions[i][1]) # Set camera resolution height
    caps.append(cap)
Next, the program initializes each camera using the OpenCV VideoCapture. It loops through the number of cameras, initializing each camera using its USB device index and setting the resolution based on user-defined parameters. It creates an array named “caps” to store the VideoCapture object for each camera.
OpenCV accesses cameras by their USB device index. Typically, the USB camera index starts at 0 and counts up by 1 for each camera plugged into the system. The index for the first camera is “0”, the index for the second camera is “1”, and so on. On Linux systems, however, the indices go like “0”, “2”, “4”, and so on. The index order is randomly set on system powerup.
4. Capture and Display Frames
### Continously grab and display frames from each camera
while True:

    # Loop through each camera
    for i in range(num_cameras):

        # Grab frame from camera
        hasFrame, frame = caps[i].read()
        if not hasFrame or len(frame) == 0:
            print(f'Unable to read frame from camera {i+1}! This usually means the camera is not connected or is not working. Exiting program.')
            sys.exit()

        # Perform desired processing on each camera frame here. For this example, we will run adpative thresholding on frame if enabled
        if enable_thresholding[i] == True:
            frame = cv2.cvtColor(frame, cv2.COLOR_BGR2GRAY) # Convert frame to grayscale
            frame = cv2.adaptiveThreshold(frame, 255, cv2.ADAPTIVE_THRESH_GAUSSIAN_C, cv2.THRESH_BINARY, 25, 2) # Threshold frame

        # Display camera frame
        frame = cv2.resize(frame, (640, 360))
        cv2.imshow(f'Camera {i+1}', frame)

    # Wait for user keypress
    key = cv2.waitKey(5)
    if key == ord('q'): # Press 'q' to quit
        break
Now that the cameras are initialized, the program enters an infinite loop to continuously grab frames from each camera. It loops through each camera, reads a frame, and checks if the frame is successfully grabbed. If enable_thresholding is set to True for that camera, an OpenCV adaptive threshold is applied to the frame to turn it black-and-white. The frames from each camera are displayed in their own OpenCV window. The program waits for a key press and exits if the user presses ‘q’.
5. Cleanup
# Clean up
cv2.destroyAllWindows()
cap.release()
Once the loop is exited, the program cleans up by closing all OpenCV windows and releasing the camera resources.
Running the Code
Hardware Setup
Make sure all the USB cameras are plugged into the computer or device. If you’re using USB2 cameras, make sure each is plugged into its own USB channel as explained in the first half of this article. If you’re using USB3 cameras, make sure they are plugged into USB3 ports. You can confirm the cameras are working by using an app like Camera on Windows and displaying the live view from each camera.
Python Environment Setup
Download and install Anaconda, a handy Python package manager that makes it easy to up virtual environments. We’ll use this environment to install OpenCV-Python, which is needed to access the cameras.
Once it’s installed, open Anaconda Prompt from the Start Bar. A command window will appear. Enter the following commands to create a new virtual environment named “opencv-env” and activate it:
conda create -n opencv-env python=3.12 -y
conda activate opencv-env
Install OpenCV-Python by issuing:
pip install opencv-python
Finally, move to your Documents folder and download the example code by issuing:
cd %USERPROFILE%\Documents
curl -o multi_usb_cam.py https://ejtech.io/code/multi_usb_cam.py
Next, we’ll modify the code to set the number of cameras and resolution for each camera.
Running the Cameras
The mutli_usb_cam.py script will be in your Documents folder. Open it with a text editor and modify the code to use the desired number of cameras. For example, if you’re using 3 cameras, set “num_cameras = 3” on Line 9 and removed the unneeded parameters for cam4. If you’re using 6 cameras, set “num_cameras = 6” and add parameters for cam5 and cam6.
Set the resolution for each camera in (W, H) by modifying the “camN_res” variables. Enable or disable thresholding on each camera by setting “True” or “False” in the “enable_thresholding” variable.
When you’re done editing the file, run the script using the following command in the Anaconda Prompt window:
python multi_usb_cam.py
Windows will appear showing the live view from each camera. If thresholding was enabled on any camera, it will appear black and white. You can press ‘q’ to quit the program.
Next Steps
The multi_usb_cam.py program is just a basic example that shows how to grab and display frames from multiple cameras. Next, try adding more custom processing on each frame to do things like detecting faces with OpenCV Haar Cascades, or running YOLO object detection on each frame.
This code example uses a single-threaded approach to grabbing frames from every camera, which significantly reduces the overall FPS the program runs at. It can be more efficient to use one processing thread for each camera. For an example of how to use Python multiprocessing to run multiple cameras, see our upcoming article (link to be added soon).
Conclusion
In this article, we covered the hardware requirements for running multiple USB cameras. In general, USB2 cameras each require their own USB channel, while multiple USB3 cameras can share a channel as long as it is USB3. We also went over a basic example showing how to grab and display frames from multiple cameras using OpenCV. From here, you can build an application around multiple cameras to do things like object tracking, surveillance, or multi-point inspection.
Visit our article on running YOLO on multiple cameras (link to be added soon) to see examples of how to efficiently run object detection models on multiple camera streams.
EJ Technology Consultants has worked on several projects that involve using multiple USB cameras to gather and process visual data. If you need help evaluating USB cameras or compute devices, please contact us at info@ejtech.io.